
Well, I finally gave in and got an ipod recently and I've neglected my videogame stuff in favor of meticulously uploading albums and looking for podcasts. I considered writing a post gushing about how great ipods and podcasts are, but I'm not sure the internet needs more pollution about nearly decade old technology.
That said, I'm not sure where this blog is going. It was originally intended to just be advertising for my currently defunct etsy store until I realized there's no reason to come to a blog just to see updates on an etsy store, since you can just go to that etsy store. I turned it into a "personal blog" to give people content you can't find on etsy.
I'm not some one who is into self expression for the sake of self expression, so personal blogs are a hard sell for me. I always liked personal zines, but those take a lot of time, effort, and money so it weeds out a lot of the people who put less effort into their public diaries than they would a fart. Back in the day, a few skims through livejournal and I concluded personal blogs were something to be avoided.
But about 5 years ago, I stumbled across a teenaged girl's blog that detailed her to day to day life. On its face, it was mundane stuff - she had an asshole ex and an afterschool job and she spent her spare time reading and cutting herself - but it was well written and hit all the right notes. It was just angsty enough to emphasize, but not so angsty it delved into self pity. It was arty enough to be interesting, but never dwindled into pretense. Smart but not pedantic, introspective but not naval-gazing, and so on and so on. I felt a bit like I was reading the blog of a Daniel Clowes heroine.
Then she got a new boyfriend and spent most of her time blogging about how awesome he was, and I lost interest. But it did leave me with the impression that personal blogs can be awesome. I'm not sure I'll ever be able to write about my day to day life because I'm not sure I have the skill nor the inclination to make it as interesting as the teenaged girl did, but I am going to make it a resolution (oh, let's make it a New Year's resolution, simply since the timing is convenient) to try to pollute the internet a little more.
So expect personal-style posts about tv shows, movies, books, poker and so forth. I'm not sure what it will accomplish, if anything, but I'd like to give it a go. Of course I'll keep updating on the video game crafts since any glance at my stat counter instantly reveals that's why people visit this thing, and I'm not one to deny people what they want.
Tuesday, December 30, 2008
Wednesday, December 24, 2008
NP: Sonic Youth - Incinerate
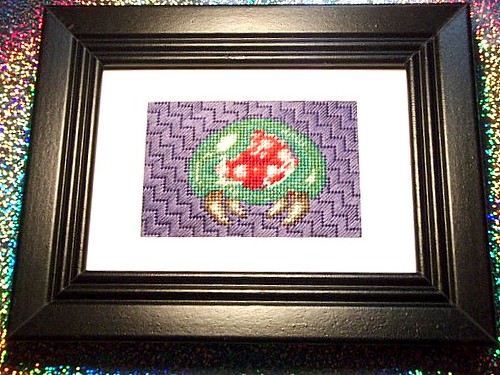
I finished the second Metroid I was working on:
And some works in progress shots:
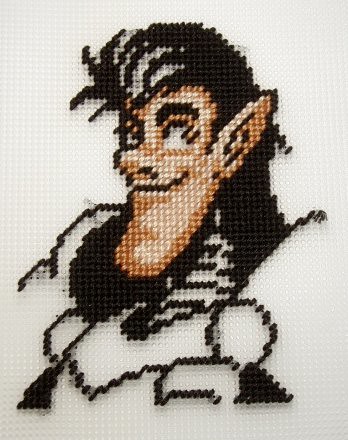
Hopefully this is looking more like Pelle and less like the beginning of a Jackson Pollock painting.

The going is, uh, slow on little Domingo. He's a little boring to work on.

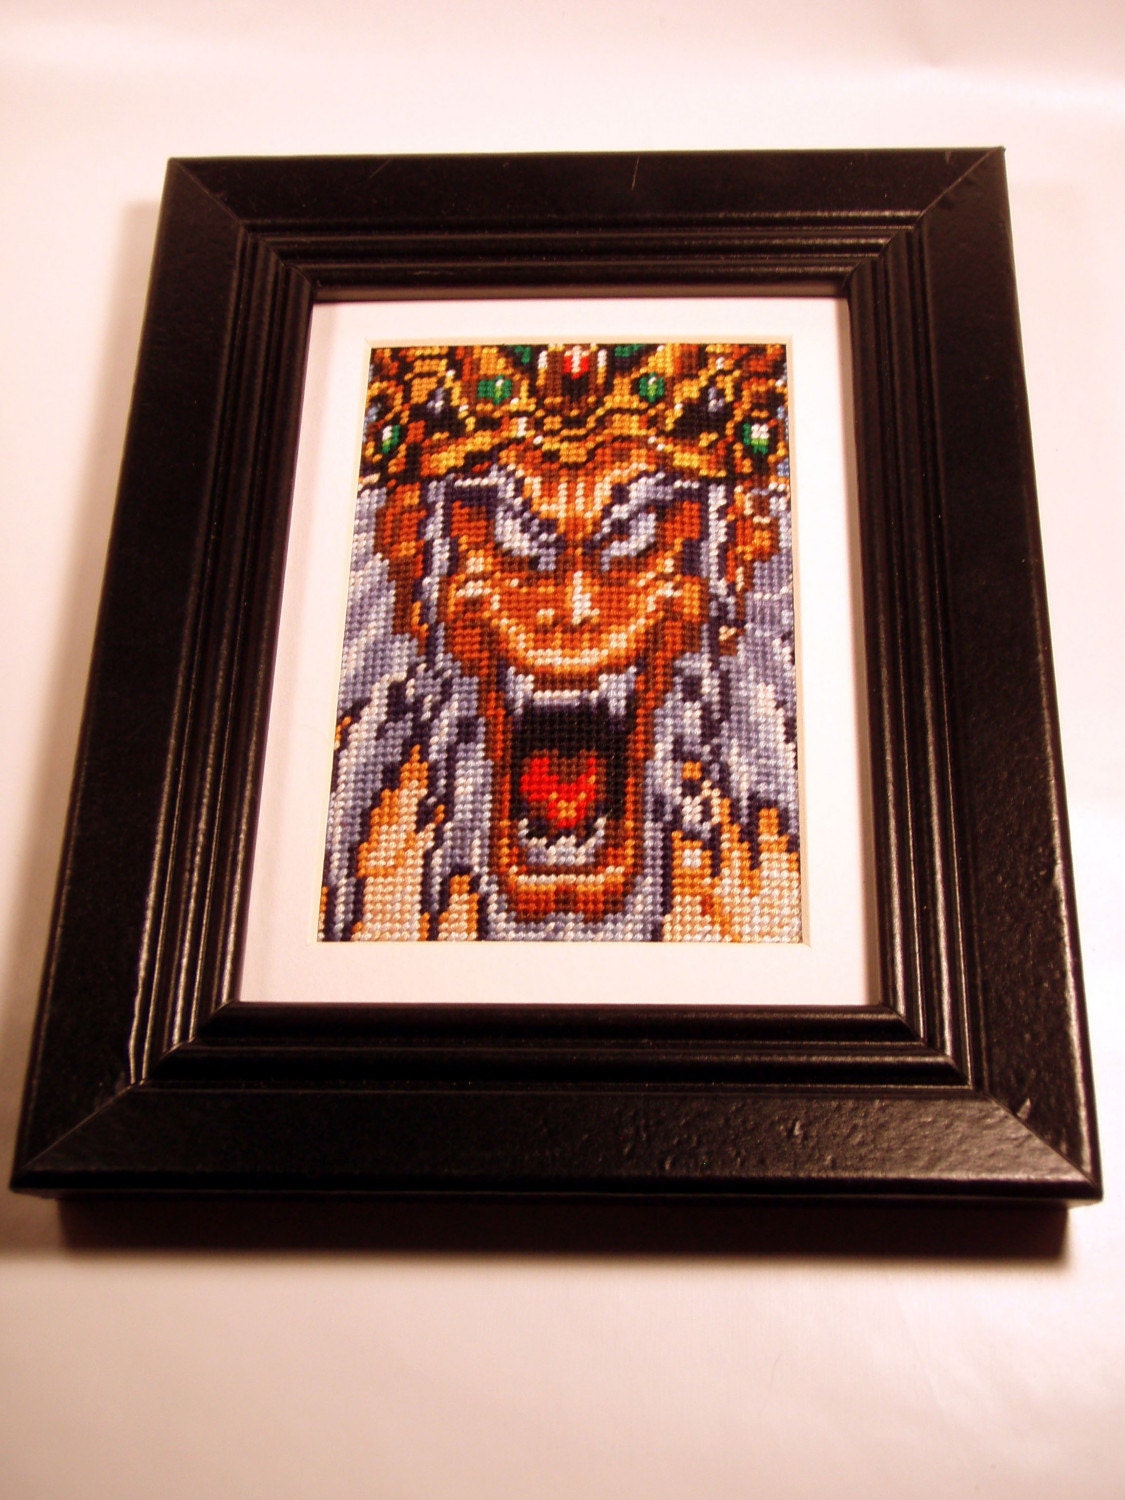
Another Dragon Quest monster. I was thinking of creating at least three of these (the already completed Godbird + WIP Face Tree + ????) using primary color backgrounds. Maybe if I have the stamina I'll make a full ROYBGIV series.
And some works in progress shots:
Hopefully this is looking more like Pelle and less like the beginning of a Jackson Pollock painting.
The going is, uh, slow on little Domingo. He's a little boring to work on.
Another Dragon Quest monster. I was thinking of creating at least three of these (the already completed Godbird + WIP Face Tree + ????) using primary color backgrounds. Maybe if I have the stamina I'll make a full ROYBGIV series.
Tuesday, December 23, 2008
NP: The Only Ones - Some One Who Cares
I'm a fan/user of the website 43 Things - the idea is to put together a list of up to 43 goals and then publicly document your progress. You can choose from already created goals, make up your own, whatever.
Most of my goals have been sitting on my list for a year or more with little to no progress made. Occasionally, I delete a few either because I decide they're stupid (Beat all the Zelda Games) or because they're not going to happen in the foreseeable future (Eat at In-N-Out Burger...yeah, I reach for the stars). And some of the ones I have accomplished, I haven't so much "accomplished" and instead just did once or twice so I could check it off and list something else. Did I go letterboxing once? Sure. Did I go letterboxing twice? Nuh-uh.
But even though my list is mostly stagnant, I still get a kick going through other people's goals and entries, and I occasionally stumble across a potentially valuable resource regarding lock picking or juggling. So when I saw that 43 Things was coming out with a book called Dream It, List It, Do It, I went to Barnes and Noble and bought it.
Now for some reason or another, I thought the book would focus on a handful of goals and include personal stories or resources - something along the lines of Get a Hobby or You Can Do It!, only broader in scope than the former and hopefully not as lame as the latter. And because it was holiday season and I hate crowds, I didn't bother to even crack it open to look at it first, for fear I'd waste precious seconds around noisy strangers.
But it's not a journalistic look at goal-pursuing nor a conglomerate of resources. It's mostly just one long list of goals, with the occasional anonymous personal paragraph about, say, dancing in the rain or a resource sidebar about, say, changing your name lazily inserted in intervals. And what's most infuriating about the book is the empty boxes next to each item, as if this book is actually going to function as 4,000 things to do before I die checklist. I'm sure I'll be checking off "Start a non-toxic housecleaning company" or "Become Aquaman" any day now.
I'll give 43 Things a pass for trying for the quick buck, because they're an expansive social networking site that keeps their advertising revenue to the ubiquitous but innocuous google ads and because I was too big of a dolt to skim the fat little book beforehand, but really, I feel burned.
Sunday, December 21, 2008
NP: Brian Eno - True Wheel
I finally finished it:
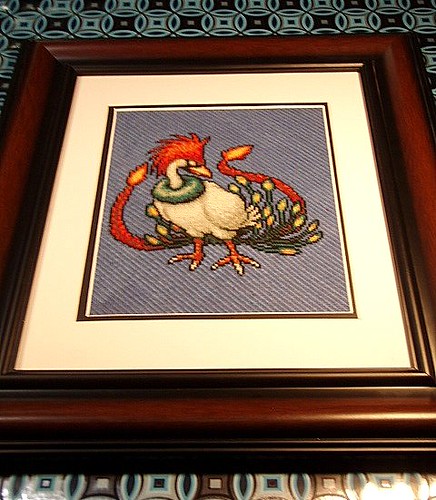
I'm pretty pleased with how it turned out, and I've already got plans for my next big Dragon Quest-related project.
I'm pretty pleased with how it turned out, and I've already got plans for my next big Dragon Quest-related project.
Monday, December 15, 2008
NP: Portishead - Half Day Closing (Live)
Well, my resolution to lessen my focus on the needlework is officially done for now. I spent the day sick in bed and instead of reading or drawing or any of the other million of things I could have done, I opted to put some dvds on and stitch.
So practical productivity for today was nil. Videogame needlework productivity for today was off the charts...well as off the charts as these time consuming projects can be.
Here's some updates:
Domingo from the original Shining Force game was some magical squid thing that hatched from an egg. When you start him off, he's horrifically weak, but if you give him a little time and attention, he turns into a killing machine.

The standard Ramia update. I am still plug-plug-plugging away at it while trying to keep my eyes from rolling to the back of my head.

Well, this probably looks like some random squiggle at the moment, but it's really just the start of Pelle, a centaur with a giant chin, also from the original Shining Force game.

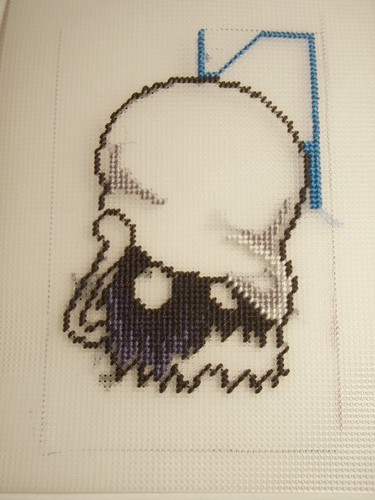
And another metroid I am working on per a request. The metroid is finished, I just need to do to the background.
Also, thanks to benjibot for pointing out that the Phoenix Wright needlepoint by rgcainmd is posted on the Sprite Stitch forums.
So practical productivity for today was nil. Videogame needlework productivity for today was off the charts...well as off the charts as these time consuming projects can be.
Here's some updates:
Domingo from the original Shining Force game was some magical squid thing that hatched from an egg. When you start him off, he's horrifically weak, but if you give him a little time and attention, he turns into a killing machine.
The standard Ramia update. I am still plug-plug-plugging away at it while trying to keep my eyes from rolling to the back of my head.
Well, this probably looks like some random squiggle at the moment, but it's really just the start of Pelle, a centaur with a giant chin, also from the original Shining Force game.
And another metroid I am working on per a request. The metroid is finished, I just need to do to the background.
Also, thanks to benjibot for pointing out that the Phoenix Wright needlepoint by rgcainmd is posted on the Sprite Stitch forums.
Sunday, December 14, 2008
NP: Mission UK - Severina
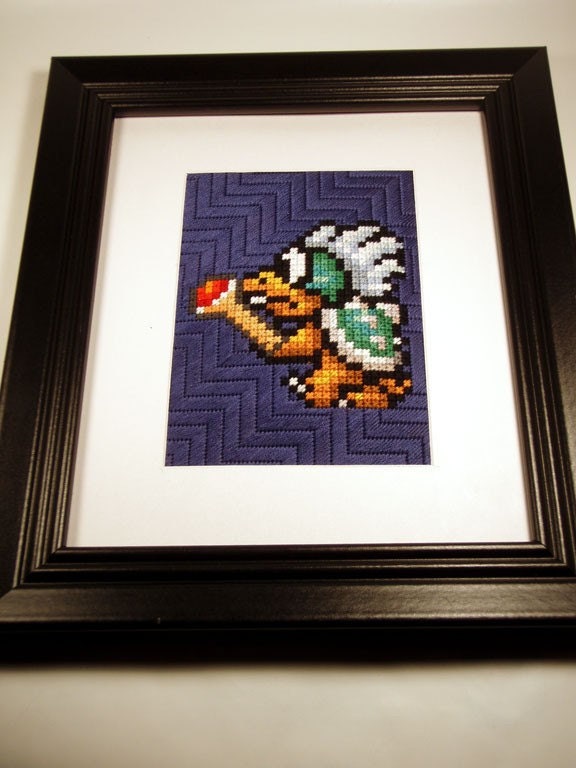
I thought I had left the giant chicken in a rental car I had after a minor car accident (not my fault) put my own car in the shop. But I found it, floating around my closet, and got back to work on it. And here's where it stands:

I'll estimate that I've got about 20-30 hours of background stitching left before it's finished. That's a lot of boredom ahead. I may start in with a few other needlepoint projects to keep me sane.
Because I'm moving in less than a month, I'm mostly in limbo. I don't want to start any long term projects or finish any bulky ones that will just contribute to the pain in the ass that is moving. That means my perler bead Megaman will probably lie in pieces for at least a month longer.
Here's a few ideas I may or may not carry out after I move:
- A complete series of The Shining Force in my usual framed needlepoint
- Topiary
- Video Game Quilts
- Needlework Pillows (I finally found a place that carries tapestry wool)
- Automata
Tuesday, December 09, 2008
NP: Siouxsie and the Banshees - This Town Ain't Big Enough for Both of Us
So I decided I will be shutting down my etsy store sometime tomorrow, probably during the afternoon after I get off work (I want to get some recent orders sent first). I'll make the metroid and Zero needlework that two people requested and then that's that for the time being. Other than that, I've got to start focusing on getting ready to move to Wisconsin and my christmas shopping.
Also, check out benjibot of Sorrytown, USA did using my tutorial. Awesome.
Some one over at Pixelgasm also used it to make a fantastic Phoenix Wright needlepoint, but unfortunately Pixelgasm moved recently and a lot of the posts were lost and they've yet to repost it. But it was awesome. Trust me.
Also, check out benjibot of Sorrytown, USA did using my tutorial. Awesome.
Some one over at Pixelgasm also used it to make a fantastic Phoenix Wright needlepoint, but unfortunately Pixelgasm moved recently and a lot of the posts were lost and they've yet to repost it. But it was awesome. Trust me.
Monday, December 01, 2008
NP: Joy Division - Warsaw
So it turns out, if I'm not doing video game fancraft, then I just don't have a whole lot to blog about. Luckily, I've gotten a few requests from people through etsy that I need to start working on (so much for the resolution to not do any more needlework for a while...once I thought I was out, they pull me back in), so I should have new pictures soon.
Sunday, November 23, 2008
NP: Mission UK - Wasteland
Thought I'd post my progress on the Dragon Quest god bird:

Assuming I decide to shut down my store on etsy, this may be the last needlework I do for a while. I was looking at my 43 things today and I realized how much stuff I've had up there for ages and haven't even started pursuing because I spend so much time on these things.
I'm sure I'll be aching to decorate my Wisconsin apartment with them, but until then, I need to do some other things.
Friday, November 21, 2008
NP: Wire - Mr Suit
I managed to finish this today:
It'll go up on etsy in the next few days if the person who requested it no longer wants it (it's been a while, so that's a distinct possibility).
While I'm at it, I should note that I'm also seriously considering shutting down my shop. I enjoy the idea of these things floating around strangers' houses and the extra income is nice, but running the shop and having a full time job is starting to take its toll. Then again, I've had a rough couple of days, so it may just be my bad mood talking. I'll have to mull it over.
Oh, and an update on that giant chicken:

Wednesday, November 19, 2008
NP: Psychedelic Furs - Midnight to Midnight
I played another round of Arkham Horror tonight, and while the game is supposed to take 2-4 hours (according to the box top), I have found I can lose much more quickly than that.
While playing, I took some notes - yes, seriously - just to illustrate how ridiculous the game is. That's assuming I am literate and understood the rules correctly, which isn't really a safe assumption.
10:10 pm - I choose Amanda Sharpe, the student, at random to be my investigator and Nyarlathotep to be the villain I'm not so secretly rooting for.
Amanda, like all the investigator choices, gets a certain amount of items drawn at random at the beginning of the game, but I won't bother to recount them here since I never once used any of them.
Now the point of this game is basically to not let things get too fucked up and let Nyarlathotep wake up. Gates to other worlds are opening and spawning monsters almost every turn and, as a solo investigator, I can't allow 1) the number of open gates to reach 8, 2) the town to get too freaked out and overrun with monsters (measured by "the terror track" which goes to 10), 3) myself to take too long (measured by Nyarlathotep's "doom counter"). There's a few other official ways to wake up Nyarlathotep, but they are of no concern to me right now because I will have already lost before they're even remotely a possibility.
If Nyarlathotep wakes up, and he will, I can still fight him, but as you will see, that method doesn't work out too well.
10:15 - The game opens with a gate leading to the City of the Great Race opening up in the graveyard and it spits out a Star Spawn monster. Because a gate opened up, the doom counter moves to 1 (Nyarlothotep's doom counter goes to 11).
10:18 - Because of some movement limitations, I can't make it over to the graveyard so I bum around my side of the board and try to collect tokens I'll technically need but never have a chance to use. While I'm doing this, not only does another gate to the Plateau of Leng open up, but something bites me and I lose some stamina and sanity. Sigh. Doom Counter is now at 2.
10:24 - I manage to make it through the dimensional gate and into the Plateau. The Plateau turns out to be a quiet place to rest for now, and I gain back one of my stamina points. This is the only good thing that has ever happened to me during this game.
While I'm exploring the plateau, another gate opens up back in Arkham. Doom count = 3.
10:27 - I'm still exploring the Plateau (you must spend 2 turns exploring in order to have a chance of closing the gate afterwards). While I'm exploring, the humidity gets to me and I lose that stamina point that I got back the last turn. Sigh.
Back in Arkham, another gate opens up to Celeano while I'm dying of heat in the plateau. Doom Count - 4.
10:30 - This is a good turn...I get through the gate and back into Arkham and manage to close the gate. And another gate doesn't open up, although there's a sudden surge of monsters in town.
10:33 - Again, I can't manage to reach anymore gates so I have to bum around and pretend like I'm not wasting valuable time. I find out something horrible about my family tree and lose some more sanity.
A gate to R'lyeh opens up. Doom Count - 5.
And this is where the kiss of death comes: Miskatonic University starts doing experiments on monsters, and if I don't kill the monsters off, they will multiply and break out into the streets.
10:36 - I try to make my way to Miskatonic U, but can't quite make it.
No gate opens up this time, but a monster surge fills up the outskirts and the terror track makes its first advance from 0 to 1.
10:42 - I try to kill off one of the easier monsters in Miskatonic University and fail.
No gate opens up again, but that just means there's another monster surge.
10:45 - I fail to kill the Miskatonic University monster again, and all hell breaks loose. The streets fill up with monsters, the terror track instantly goes to 10, its highest setting, and because there is so much shit going on, Nyarlathotep wakes up.
Now I've been avoiding going into stat mechanics, but it's kind of important here. My maximum fight stat is 4, which usually means I can roll 4 dice and hope one of them hits 5 or 6 for a successful attack. But I have to temper this against Nyarlothotep's combat rating, which happens to be -4, which happens to mean I have 0 dice to roll to get the 5 or 6 that I need. See the issue here?
Of course, I got a magic spell in the beginning of the game that would let make 9 additional dice rolls (at the cost of my sanity, however), but wouldn't you know, Nyarlathotep is resistant to magic.
He takes about 3 turns to devour me.
10:55 - I've now managed to efficiently and thoroughly lose a 2-4 hour game in just under 45 minutes. And I actually did relatively well this game. I never once lost a turn or got booted to the "lost in space and time" square, which is where I spent the majority of my time the last few games.
Tuesday, November 18, 2008
NP: The Jam - Away from the Numbers
I have to wake up in about 6 hours, so I need another quick post. Looks like I'm going to have to showcase another bookcase...I'll do two, since one of these bookcases is admittedly pretty boring.
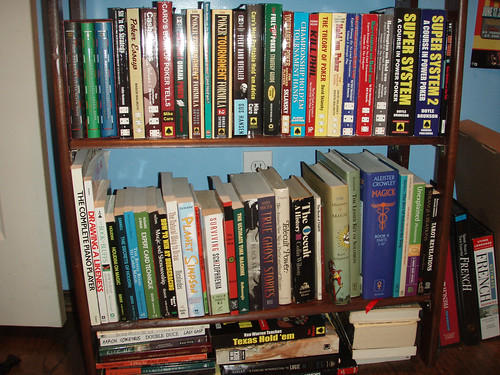
The boring one: top shelf holds my poker books, bottom shelf holds my occult books on the right and a healthy mix on the left, the stuff on the floor is holding the broken bottom shelf up.
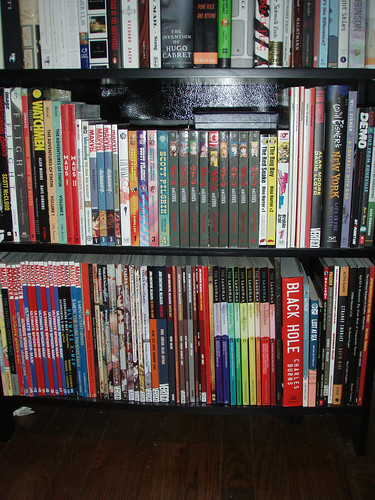
My graphic novels shelf - a few favorites include: Scott Pilgrim, The Sandman series (missing volume 3 due to the cat knocking shit over), Hellblazer, Fables, Daniel Clowes stuff, Will Eisner stuff, EC Comics Collections.
The Hexen 2039 book on the top shelf is pretty intriguing. An artist created a time travelling alter ego who makes diagrams and illustrations to construct all these connections between things like the Wizard of Oz, nazis, and US military experiments.
England's Dreaming focuses on the Sex Pistols, mostly, but its discography in the back pretty much laid the foundation for my musical taste.
There's also an Exploding Dog book on the same shelf. I've always liked using Exploding Dog pictures and their titles for mix tapes.
The boring one: top shelf holds my poker books, bottom shelf holds my occult books on the right and a healthy mix on the left, the stuff on the floor is holding the broken bottom shelf up.
My graphic novels shelf - a few favorites include: Scott Pilgrim, The Sandman series (missing volume 3 due to the cat knocking shit over), Hellblazer, Fables, Daniel Clowes stuff, Will Eisner stuff, EC Comics Collections.
The Hexen 2039 book on the top shelf is pretty intriguing. An artist created a time travelling alter ego who makes diagrams and illustrations to construct all these connections between things like the Wizard of Oz, nazis, and US military experiments.
England's Dreaming focuses on the Sex Pistols, mostly, but its discography in the back pretty much laid the foundation for my musical taste.
There's also an Exploding Dog book on the same shelf. I've always liked using Exploding Dog pictures and their titles for mix tapes.
Monday, November 17, 2008
NP: The Smiths - Vicar in a Tutu

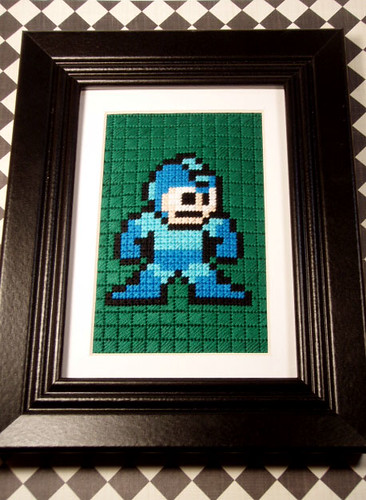
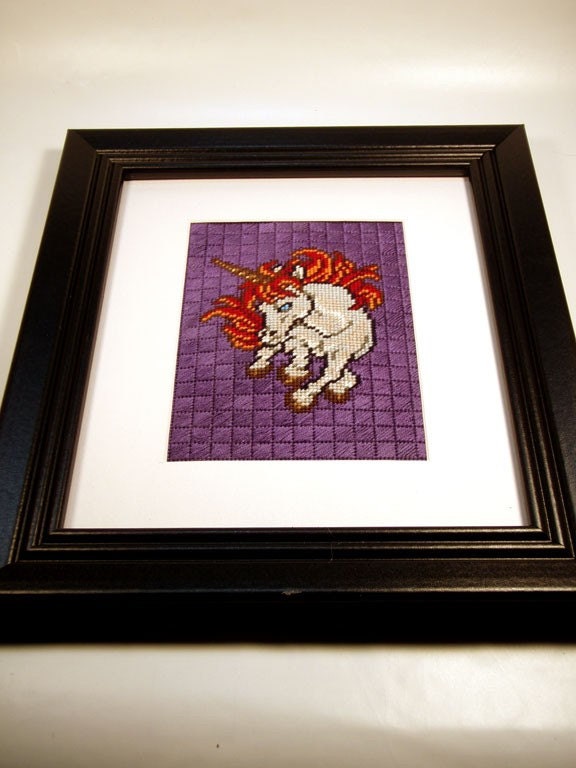
Truth be told, I sometimes get a little emo making stuff with the intention of selling it. And since I ran out of Megaman blue today and was too sick to make my daily trip to the craft store anyway, I decided to use the downtime to start making something specifically for me.
I settled on the god bird from the Dragon Quest series; it's always ridiculously hard for me to pick a Dragon Quest character because I go into this "They're all so cute!" mode usually reserved for pet stores. She has a couple of different names throughout the games she's in, but the one I remember is Ramia. My mom calls her "that giant chicken".
I'm hoping to finish her before I move to Wisconsin.
Sunday, November 16, 2008
NP: Talking Heads - Girlfriend is Better
Aside from mailing a few things out, I took the day off from videogame fancraft and instead played the Arkham Horror game as promised. I played it twice and, as promised, the game tore me a new one each time. It took me about 4 hours as Dexter Drake, the magician, to finally lose to Azathoth and only about an hour before Cthulhu destroyed Ashcan Pete, the "drifter". Ashcan Pete probably shouldn't have tried to steal $8 from a Miskatonic University student, but it seemed like a good idea at the time.
Now I have to stop my futile attempts to save the misguided citizens of Arkham and get back to videogame stuff....I'm planning on trying some pendant experiments as well as making some stained glass triforce suncatchers. I've also had a couple of requests for more megaman needlepoints, so I'll have to get on that.
Now I have to stop my futile attempts to save the misguided citizens of Arkham and get back to videogame stuff....I'm planning on trying some pendant experiments as well as making some stained glass triforce suncatchers. I've also had a couple of requests for more megaman needlepoints, so I'll have to get on that.
Friday, November 14, 2008
NP: Adam and the Ants - Ants Invasion

I don't know if it's the Thomas Ligotti stories I've been reading lately, the recent e-mail I got from Chaosium, or if the stars are just right, but I have been jonesing for some great old ones. So, armed with a 15% off Barnes and Noble coupon, I finally gave in and bought this Lovecraft-based board game.
According to one amazon reviewer, the point of the game is not to win; the point of the game is to see just how badly you lose. Sounds great to me. And what's its other main selling point? It's meant for 1 to 8 players. The days of playing Monopoly against myself are over.
Unfortunately I won't be playing it tonight, as it apparently requires 5 hours and a PhD just to
Thursday, November 13, 2008
NP: The Editors - Someone Says
I finished this tonight:

Not sure how I feel about it - I used white plastic canvas this time instead of my usual clear, and it's not very forgiving.

Not sure how I feel about it - I used white plastic canvas this time instead of my usual clear, and it's not very forgiving.
Wednesday, November 12, 2008
NP: The Dickies - You Drive Me Ape (You Big Gorilla)
For those of you who remember the big Megaman in perler beads that I was working on: I threw him out in a fit of rage after an ill fated ironing attempt.
But I'm trying again - this time using a technique that Doctor Octoroc devised. Instead of making one big fat sprite, you divide them up into sections and construct a pretty intimidating layered base out of foamcore. Honestly, I'm not sure I have faith in my abilities to make the foamcore base. Maybe I should have stuck with ironing.
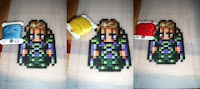
It's probably going to be a while before I get to test my foamcore finesse, as I'm about to run out of a shade of blue. Here's what I have so far:

Just lying the pieces on top of each other for now:

But I'm trying again - this time using a technique that Doctor Octoroc devised. Instead of making one big fat sprite, you divide them up into sections and construct a pretty intimidating layered base out of foamcore. Honestly, I'm not sure I have faith in my abilities to make the foamcore base. Maybe I should have stuck with ironing.
It's probably going to be a while before I get to test my foamcore finesse, as I'm about to run out of a shade of blue. Here's what I have so far:

Just lying the pieces on top of each other for now:

NP: Comsat Angels - Red Planet Revisited
Now for sale on etsy:
.jpg)
$12 + shipping & handling
Check out my neat background. I've seen a lot of etsy sellers using what looks like scrapbook paper for their backdrops, so I thought I would give it a go myself.
Check out my neat background. I've seen a lot of etsy sellers using what looks like scrapbook paper for their backdrops, so I thought I would give it a go myself.
Tuesday, November 11, 2008
NP: Public Image Ltd - Rise
I don't know if it's just me, but I like shifting through people's bookcases the first, second, third time I'm invited over (I'm not usually invited over more than that).
Now I intended to put some new coasters up on etsy and take some Work in Progress photos of, uh, some works in progress. But I am so tired and lazy and I really just want to sleep or die. So, instead I'm going to make this relatively easy on me and post some pictures of one of my bookcases. The rest of my bookcases will be posted on later dates, to avoid another irritating (for me and you!) gigantic, image heavy post.
Let me also point out I haven't read a lot of these books. I work in a used bookstore where the inventory is unpredictable and the employee discount is amazing. I have a bad habit of using my discount to buy books with the "I'll never be able to get them this cheap again" excuse.
Note: I was hoping to get some flickr-like notes added to them, but I don't know how to do it outside of flickr and figuring it out would destroy the point of this fuss-free post. I'll post some short notes here as well as keep the links to flickr operational, in case you can't wait to see the rest of my books.
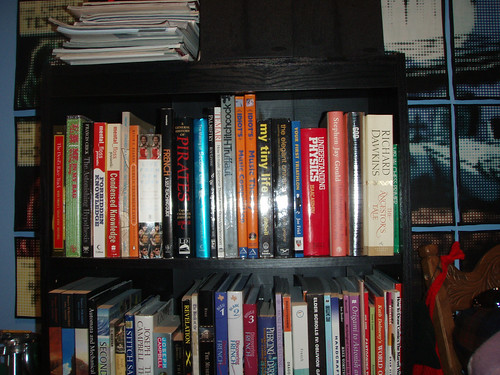
Notes: Far left book is a Mark Twain book containing his "dark writings". While 'The Mysterious Stranger' isn't included in the volume, I'd recommend reading it, or at least checking out this youtube excerpt from a Mark Twain-based claymation movie.
The green book to the right is called "Me in My Bag" - a neat book where a photographer goes around London asking 100 people what's in their bag/purse/backpack and taking photos of the contents. Unfortunately, most people are boring and they carry boring things.
My Tiny Life by Julian Dibbell - all about life in LambdaMOO. I like to wander around the now mostly empty MOO every once in a while; it's like walking through cyber ruins.

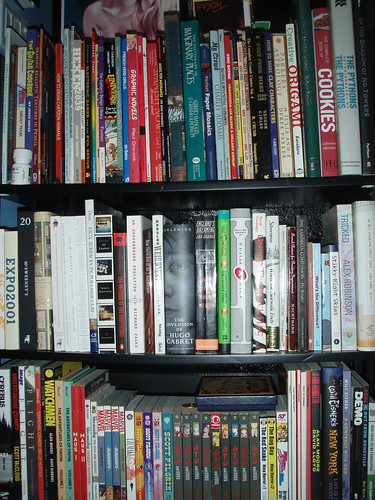
Notes: Far left is a collection of modern day retellings of Dante's Divine Comedy, complete with modern day illustrations.
Next to that is perhaps the coolest book I own. I will get around to making automata one day.
And next to that is one of my second life handbooks. I like wandering around Second Life from time to time, but I don't think I'll ever "get it". I will say the goth in me really likes having the name Switchblade Constantine.
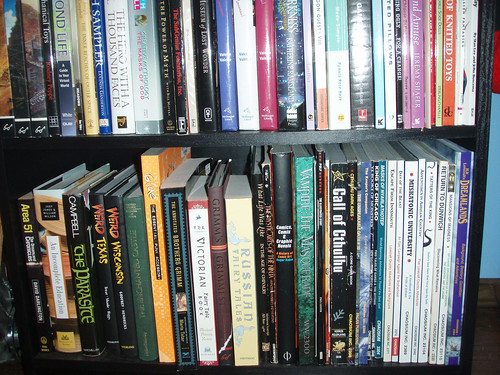
Notes: The orange book is Sniffin Glue, a compendium of one of the most famous punk zines from back when punk was still interesting.
On the right is my ever-growing collection of Chaosium Call of Cthulhu RPG books.
And that's that.
I also have post titles now. Imagine that! I mostly listen to my Pandora station while posting, so unless I can come up with a particularly clever post title (Magic 8 ball says: Outlook Not So Good), I'll be abrasively announcing whatever's playing when I start the post. I mostly just feel I need a clear cut divider between posts.
Now I intended to put some new coasters up on etsy and take some Work in Progress photos of, uh, some works in progress. But I am so tired and lazy and I really just want to sleep or die. So, instead I'm going to make this relatively easy on me and post some pictures of one of my bookcases. The rest of my bookcases will be posted on later dates, to avoid another irritating (for me and you!) gigantic, image heavy post.
Let me also point out I haven't read a lot of these books. I work in a used bookstore where the inventory is unpredictable and the employee discount is amazing. I have a bad habit of using my discount to buy books with the "I'll never be able to get them this cheap again" excuse.
Note: I was hoping to get some flickr-like notes added to them, but I don't know how to do it outside of flickr and figuring it out would destroy the point of this fuss-free post. I'll post some short notes here as well as keep the links to flickr operational, in case you can't wait to see the rest of my books.
Notes: Far left book is a Mark Twain book containing his "dark writings". While 'The Mysterious Stranger' isn't included in the volume, I'd recommend reading it, or at least checking out this youtube excerpt from a Mark Twain-based claymation movie.
The green book to the right is called "Me in My Bag" - a neat book where a photographer goes around London asking 100 people what's in their bag/purse/backpack and taking photos of the contents. Unfortunately, most people are boring and they carry boring things.
My Tiny Life by Julian Dibbell - all about life in LambdaMOO. I like to wander around the now mostly empty MOO every once in a while; it's like walking through cyber ruins.
Notes: Far left is a collection of modern day retellings of Dante's Divine Comedy, complete with modern day illustrations.
Next to that is perhaps the coolest book I own. I will get around to making automata one day.
And next to that is one of my second life handbooks. I like wandering around Second Life from time to time, but I don't think I'll ever "get it". I will say the goth in me really likes having the name Switchblade Constantine.
Notes: The orange book is Sniffin Glue, a compendium of one of the most famous punk zines from back when punk was still interesting.
On the right is my ever-growing collection of Chaosium Call of Cthulhu RPG books.
And that's that.
I also have post titles now. Imagine that! I mostly listen to my Pandora station while posting, so unless I can come up with a particularly clever post title (Magic 8 ball says: Outlook Not So Good), I'll be abrasively announcing whatever's playing when I start the post. I mostly just feel I need a clear cut divider between posts.
Saturday, November 08, 2008
I love stoopidgerl's photostream so much that it hurts. It makes me want to take up photography (again) and strive to make every picture I take look vibrant and awesome, rather than perfunctory and "well, you get the idea"-ish.
Now for sale in my etsy shop:

$12 + shipping
Some one contacted me and suggested I try making Chrono Trigger coasters - a very good idea, I think - and this is what I managed.
I might try making another set of these, only including as much of the body as I can fit. I find something unsettling about their disembodied faces staring at me. But I will put these up in my shop for now and see if they garner any interest or not.
Friday, November 07, 2008
A few weeks ago, my friend Joe - who generally has no creative inclination of any kind...who really has no inclinations other than to drink beer and play poker - told me he wanted to learn how to make soap. And so I made fun of him, as you do.
There is still a part of me that balks at crafts as being for grandmothers and hippies. It was only in the past few years that I realized the carte blanche aspect of crafting allows for almost all of them to be used to make something "cool". But, at least when Joe mentioned it, soap-making was one of those rare exceptions where I saw no potential - unless there's a way to make your own soap molds, in which case I'd make a Dragon Warrior slime shaped one (note to self: find out if this is possible).
Then, during an etsy browsing session, I clicked on a thumbnail for what I thought was a piece of cake (in retrospect, this may have been a stupid assumption...like the time I assumed that orange stuff on sushi was cheese) but was actually a piece of soap. That got me to start reading all the descriptions of handmade soaps and I was impressed with the variety of scents, nutrients, molds, etc.
So then I decided I wanted to make soap too, and I finally got around to trying it for the first time tonight. I bought an opaque soap base, which I assume is the soap-making equivalent of a cake mix. You basically just melt it in the microwave, throw in some drops of scents and coloring and pour into a mold and let it sit there for about an hour.
One of the soaps I found most intriguing on etsy was an orange creamsicle soap, so I dug up this recipe and got to work. And while I was waiting for the vanilla part to harden, I went ahead and made a peppermint scented soap as well. The verdict in poorly taken photographs:

Top of the soap

Bottom of the soap
I should definitely work on getting the bottom more even and not so jagged. And, more obviously, I should learn how to swirl colors throughout the entire bar and not just the bottom.
I took a shower (shocker, I know - maybe this will be an upside to this new hobby) and used a creamsicle bar. It worked fine, I think, and smelled good - but I don't think the scent "stuck" to me as much as I would have hoped. Then again, there's no one around for me to shove my arm into their face and ask if it smells like a popsicle.
I'm not sure I will ever get interested enough in soap to start making it from scratch, nor am I sure I will ever try to sell it - but I will keep messing around with it. People who know me can probably expect some of it for christmas.
There is still a part of me that balks at crafts as being for grandmothers and hippies. It was only in the past few years that I realized the carte blanche aspect of crafting allows for almost all of them to be used to make something "cool". But, at least when Joe mentioned it, soap-making was one of those rare exceptions where I saw no potential - unless there's a way to make your own soap molds, in which case I'd make a Dragon Warrior slime shaped one (note to self: find out if this is possible).
Then, during an etsy browsing session, I clicked on a thumbnail for what I thought was a piece of cake (in retrospect, this may have been a stupid assumption...like the time I assumed that orange stuff on sushi was cheese) but was actually a piece of soap. That got me to start reading all the descriptions of handmade soaps and I was impressed with the variety of scents, nutrients, molds, etc.
So then I decided I wanted to make soap too, and I finally got around to trying it for the first time tonight. I bought an opaque soap base, which I assume is the soap-making equivalent of a cake mix. You basically just melt it in the microwave, throw in some drops of scents and coloring and pour into a mold and let it sit there for about an hour.
One of the soaps I found most intriguing on etsy was an orange creamsicle soap, so I dug up this recipe and got to work. And while I was waiting for the vanilla part to harden, I went ahead and made a peppermint scented soap as well. The verdict in poorly taken photographs:


Bottom of the soap
I should definitely work on getting the bottom more even and not so jagged. And, more obviously, I should learn how to swirl colors throughout the entire bar and not just the bottom.
I took a shower (shocker, I know - maybe this will be an upside to this new hobby) and used a creamsicle bar. It worked fine, I think, and smelled good - but I don't think the scent "stuck" to me as much as I would have hoped. Then again, there's no one around for me to shove my arm into their face and ask if it smells like a popsicle.
I'm not sure I will ever get interested enough in soap to start making it from scratch, nor am I sure I will ever try to sell it - but I will keep messing around with it. People who know me can probably expect some of it for christmas.
Thursday, November 06, 2008

Last day for free shipping on needlepoint in my etsy shop
So it is official: I am moving to Wisconsin. I am not moving as soon as I thought I would be, which has its pros (I can save more money) and cons (I am not moving as soon as I thought I would be), but I should be knee deep in cheese by February.
So, in the meantime, I will continue to work on this blog, my flickr, my etsy shop, and I may even attempt to get some one - anyone - to look at my deviant art page, which I have neglected to do in the past.
I will also be attempting to make this blog more than just some place to compile my etsy shop updates, since that's kind of redundant. This means I'm going to have to write about myself and what I am doing, which is kind of foreign to me.
Here's a few ideas for the future:
- posting a pictoral tour of my apartment (you know you want it)
- posting more "Works in Progress" posts
- posting more tutorials
- maybe start some massive project like benjibot's quest to cross stitch all of the original dragon warrior monsters
- take up some new crafts and post pictures, failures and all, of the progress
- maybe I'll do another survey or two, but let's face it: they're kind of stupid
Also I'll be refining the blog in more mundane ways: adding widgets, adding tags, changing the layout, networking, etc.
Wednesday, November 05, 2008
Tuesday, November 04, 2008
Sunday, November 02, 2008
So I spent most of Halloween night building a cheap, DIY lightbox and re-taking photographs of all items to give my shop a more professional "I didn't just throw this on my floor and snap a picture because I would never do that" look.

I still think it needs some tweaking, but it's coming along. I'm also planning on changing this blog around as soon as I can get a spare minute to sit down and figure out the code.
Anyway, now for sale on etsy:
$25
The free shipping and handling deal is still on until Thursday.

I still think it needs some tweaking, but it's coming along. I'm also planning on changing this blog around as soon as I can get a spare minute to sit down and figure out the code.
Anyway, now for sale on etsy:
$25
The free shipping and handling deal is still on until Thursday.
Thursday, October 30, 2008

Tuesday, October 28, 2008
For my friends and family who read this, you might want to just skip this post entirely, unless you've all been harboring a secret, burning desire to make these sprite things as well, and just have never worked up the courage to ask me how to do it.
Sprite Stitching 101
So I've been being a bit of a showpony around the internet, spreading pictures of my needlepoint sprites around various forums in a way usually reserved for stolen pornographic footage and email chain letters. And if my attempts to show off aren't ignored entirely, then I'm usually met with other sprite fans asking how I make them.
Now, even though I am trying to sell them (ahem: My Etsy Shop), I have no issue with instructing other people how to make them. I've been the beneficiary of free information too many times to be into the KFC secret recipe way of doing things.
So in response to the vast multitudes (read: handful (read: small handful (read: just a couple of people))) asking for this, here is my tutorial, Getting a Pattern:
First I should confess: whenever one of my sprites is met with admiration, I am always a little surprised. I am very lazy, very clumsy, and very sloppy and I learned how to make these things mostly by skimming a needlepoint book during my lunchbreak at work. I tend to take a "just wing it" approach to these things, and many of my methods and preferences developed from laziness. So if you're a cross stitcher who spends time separating strands, preparing fabric, paying attention to your needle size, making sure the back looks neat, and so on, then you're already much better than I am and making these should be a simple matter of transitioning past the X-stitch.
Preparing the Pattern and Getting Supplies
*** Now because I tend to act first and work out the problems later, I cannot really help you much on how to prepare your work regarding how much floss you will need or where you should position your sprite on the canvas, etc. I will tell you that I will be using 14 ct plastic canvas, which means you will get 7 pixels per inch using the mosaic stitch and 14 pixels per inch using a cross or half cross stitch. If you already have a preferred method of preparation, I would recommend sticking with it. ****
1. Before going to the craft store, find whichever sprite you want to stitch and save it to your computer. I personally prefer using The Shyguy Kingdom since they have such a large selection. I would recommend using a simple sprite to start off - think a small NES character.
For the purpose of this tutorial, I am going to make Edgar from Final Fantasy VI because he is small enough to use the mosaic stitch, but complicated enough that he has some shading and thus some more in-depth color matching will be needed.
2. So first I right click and save the sprite sheet for Edgar to my harddrive:
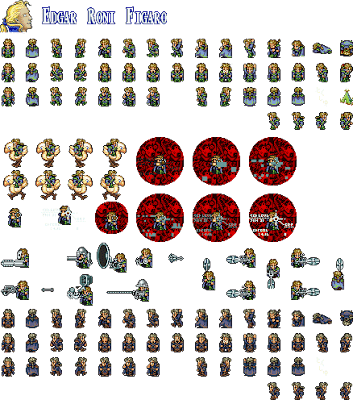
I want to do just regular old Edgar, so I will cut and paste the top left sprite into a new file on Photoshop (I am assuming you already know how to do this, but if I am assuming too much, just let me know) and save it as a bmp file. I am also going to note the size of the new file (16 pixels wide by 24 pixels long) for later.
Optional Step: If going back and forth between your home and your craft store is a big deal, figure out which color you want for the background now by using the fill bucket in the background to see which color looks good against your sprite. I usually wait until after I have finished stitching my sprite to figure out what my background color will be, but I also work next door to Hobby Lobby so frequent visits is not a big deal. When you have found a color you like, save it and PCStitch will also give you the floss number for that color.
Now I have regular old Edgar, all by his lonesome:

Ignore the fact that he looks green on this website. I don't know why that happened. The actual file on my computer does not look green, and that is the important thing.
*** Note: This next step will be a doozy, and it is ONLY TO FIND OUT WHICH COLORS YOU NEED VIA PCSTITCH. If you are doing something simple, like the original Megaman, you can run the sprite through PCStitch to get his exact colors or you can just go to the craft store and get black (310), white (5200), a fleshy color (I use 945 most of the time, but PCStitch recommends 744 in the case of Megaman), and whichever light blue and dark blue you happen to think matches up the best (by the way, PCStitch recommends 3846 for light and 3843 for dark in the case of megaman). If you are doing a complicated sprite with a lot of shading or colors, I strongly recommend using PCStitch or whatever your already preferred method is if you're an experienced stitcher. It would suck to finish one of these things, then stand back and realize it looks kind of weird because you got the wrong shade of blue ***
3. Since Edgar is has some complicated coloring going on, I am going to run him through PC Stitch first. PCStitch is a great program you can download as a demo for free (you can't save or print in the demo but we won't be needing to do that here anyway).
After opening PCStitch, go to File > Import and import the bmp file you saved earlier. The first screen will allow you to crop the picture. I don't need to crop any of Edgar, so I'm just going to hit next. The next screen allows you to erase parts of the picture. Again, I don't need to erase any of Edgar, so I'm going to hit next. Now here is the important screen:
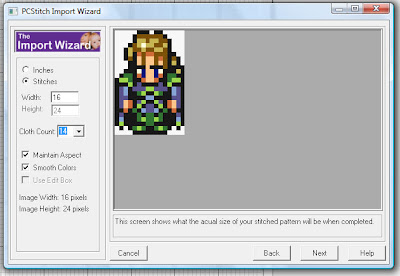
I am going to click the "stitches" option and enter in 16 pixels wide by 24 pixels long (from before when I noted the dimensions of the image in photoshop). For this particular image of Edgar, it should not matter, but I generally unclick "smooth colors" as well. It also does not matter for this tutorial (we are just using the program to get the DMC colors), but, depending on your project, you might also want to make sure the cloth count input matches your fabric or canvas. If you haven't used PCStitch before, definitely play around with it. Now that I've got Edgar to 16x24 pixels, I will click Next yet again.
Next screen is to adjust for brightness...no need for that here. Next.
Now the next screen is for floss colors. It is also not important for this tutorial, but it is a fascinating screen you should play around with when you get a chance: see what a picture will look like if you make with 14 colors or 200 colors. See what it will look like if you only use metallic floss or rayon floss, etc. But I digress: FINISH.
Now I've got my edgar pattern. I am going to go to View > Zoom to 300% and then View > Display Stiches As > Colored Blocks + Visible Symbols (or ctrl-F5). And I get this:
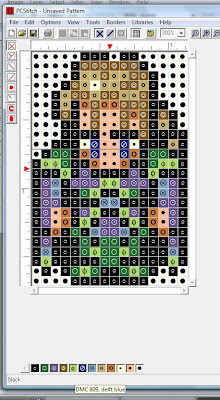
At the bottom of the screen is a row of colored blocks that correspond to the pattern. If you roll your pointer over the block, a pop up will tell you the DMC Floss number and the color name. In my image, the example is #809 - Delft Blue. Write down all the color numbers for your craft store shopping list, and if you own PCStitch, save the pattern for future reference. If you don't own PCStitch, just remember all the above steps (it will be a snap after a few times) so you can retrieve your pattern at your leisure later.
In the case of Edgar, we need 310, 319, 333, 433, 704, 796, 809, 3045, 3776, 3823, and 3825 (and if you filled in the background in the optional step, you should have a background color for that too). Most small sprites will only need 1 bundle (with leftovers to spare), maybe 2 for black and larger fields, for each color in the sprite, but the background usually uses up 3-5 bundles easy.
4. So now you've got your floss shopping list. Now if you don't already have some, add 14 ct plastic canvas (in Houston at least, in Hobby Lobby it comes in sealed packages with 2 sheets each for around $2.39 while Michaels sells them individually for around 79 cents a piece - both stores keep them near the larger plastic canvas usually in an the aisle next to the DMC floss), embroidery scissors, and needles (I prefer tapestry needles around size 20-24 as they don't prick my fingers). I usually hold off on the frame and mat until after I finish the sprite since I don't plan ahead, but if you already figured out how large it is going to be, add those to your list too - Walmart usually has some bargain frames that come with mats for $3 on display in the aisles of their stores.
If you plan on doing a lot of these, you might also want to pick up a copy of a stitch encyclopedia or sampler. I use this one. It isn't necessary for this tutorial as I will link you to diagrams of the stitches.
Now you are ready to begin stitching. I recommend finding a DVD set of a tv show you like and settling down for a marathon viewing because the stitching will take you FOREVER.
Stitching Your Sprite
This will be more free-form than the last section. I like to stitch the outline of my sprite first so I can lay the mat over it and make sure it will fit (I've learned from past mistakes), but if you prefer doing it from inside out, that's fine too. There's probably a "correct" way of doing these things, but I sure don't know it. I just know this works for me.
1. I usually just eyeball where I need to begin stitching on the canvas and can't really help you with knowing the best, prepared way to begin. If you are also an eyeballer, for your first sprite, I recommend just starting near the middle of the plastic canvas until you have gotten used to how they will translate.
You could, of course, figure out how big your sprite will be (remember, 1 inch = 7 pixels for mosaic stitch or 14 pixels for half cross stitch), how much space you will need for background and for a bias around your canvas all ahead of time so as not to waste canvas....but I can't say I do that. Then again, I have recently had some major issues with a few sprites, after hours of stitching, not fitting into the standard mat size because I did not plan ahead to make sure that they would...so fair warning.
2. I usually start with the outline, and I usually start with that in the top left corner and work my way counter-clockwise. I use all 6 strands of the floss, because I like the full look it gives.
Since Edgar is small, I will be using a mosaic stitch, which looks like a perfect little pixel. For larger sprites, I use a tent, or half cross stitch. Here are examples:

This megaman sprite uses the mosaic stitch - only the sprite is done in mosaic...we will get to the background later.

Wart is done with a tent stitch. Notice how each pixel is basically half a cross stitch
If you are new to needlework, here's an explanation of how to start a stitch. I use the waste knot most of the time:
E-How: Your First Stitch
To sum it up: You basically just make a knot in your thread, push through on the front side (the side everyone will look at when you are done) and work your stitches over the tail on the backside until it is secure enough to cut the knot off.
The mosaic looks like a cross-stitch, but it isn't. Here are two explanations the mosaic stitch:
Stitchopedia's explanation of the Mosaic Stitch
Threadneedle's explanation of the mosaic stitch
Here is an example of a tent stitch, which is basically a cross stitch with only one side of the X, if that makes sense:
Stitchopedia's explanation of the Tent Stitch
Threadneedle's explanation of the tent stitch
When you start to get to the end of your floss, push your needle through 3 or 4 stitches on the back side to anchor it and then cut the excess thread off.
So now you should be able to stitch the sprite. I personally just follow the pattern on PCStitch on the computer screen most of the time, and occasionally print out simple, easy to follow sprites through Photoshop if I plan to work on it outside of the house (you must buy PCStitch to print out patterns...I'll get around to it eventually). Some people like to graph the patterns themselves or you could even use a bead sprite you've already made for a pattern.
I usually just do outline + black first and then do the colors in whichever order strikes my fancy.
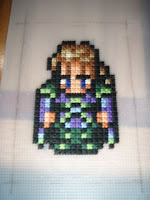
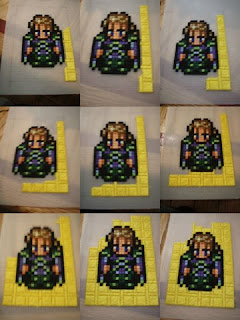
Here's what I've got done tonight:

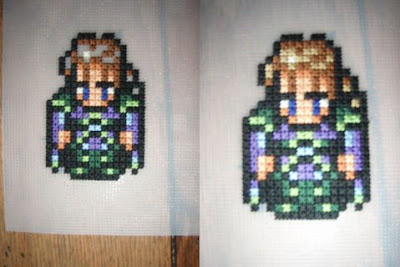
Stitching the sprite alone takes me about 4 hours to do.
Preparing for the Background
1. Now it's time to start getting ready for the background. I keep a couple of mats on hand to do this, but if you don't have a mat yet, it's not necessary.
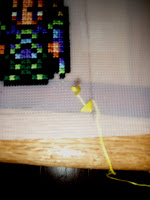
The openings for the smaller mat measures 3 inches wide by 4.5 inches tall. The larger mat opening measures 3.5 inches wide by 5.5 inches tall. I'm going to center my sprite inside the mat (if you don't have a mat, just use a ruler to figure out how big the window should be) and count the holes on each side. Then I'm going to remove the mat and trace a rectangle with a pen, adding 2-3 holes on each side for a bias.
For Edgar, that means I am going to count 10 holes up and draw a line across that row. Then I'm going to do the same thing on the bottom. On the sides I'm going to count 7 holes out on each side and draw a line on that column. Here's a picture with the rectangle:
2. Now it's time to choose the background color, if you haven't already. I have a whole stock of DMC floss, so I usually just put them up against the sprite and figure out which one I like best. When I first started stitching, I would just bring the finished sprite in with me to Michael's or Hobby Lobby and hold the floss bundles up against it until I decided which color I wanted.
Remember, you're going to want several bundles of this color because doing backgrounds definitely eats up floss like none other.
I go compare a lot more colors than this, but that's just to demonstrate. I like the yellow (#973) the best, so I'm going with that.
Stitching the Background
1. For Final Fantasy characters, it's become a tradition for me to use a variation of the Scottish Stitch:
Stitchopedia's Explanation of the Scottish Stitch
But there's tons of stitches you can choose from, you can consult Stitchopedia or, if you have one, a hardcopy Stitch encyclopedia. I try to stick to diagonal stitches because I find that they cover the canvas better.
2. I almost never follow stitch diagrams exactly for my background stitches. I like to mix it up by making the stitches wider, longer, etc. For this sprite, I'm going to make the inside cushion of the Scottish stitch a 7x7 square. I'm also going to make the border around the cushions 3 holes long because this will allow me to create an interlocking, Celtic-like pattern.
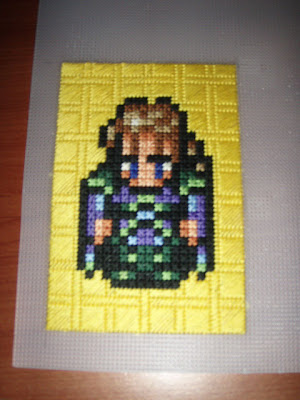
I've adjusted the contrast so you can see it better...this is the beginning of my scottish stitch, complete with the waste knot. I always start in the bottom right corner of the background.
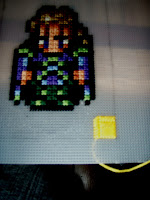
This is the first square finished, as well as the start of the border. Now I am going to kick back and watch 24 while I finish up this background, which will also take me about 3 or 4 hours to finish.
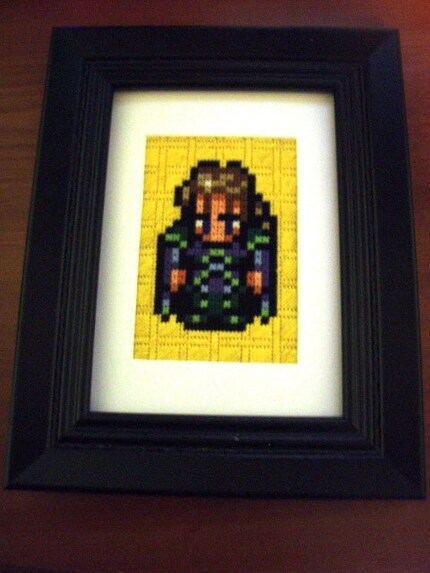
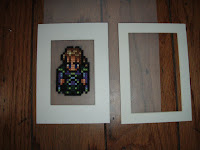
So a good chunk of season 1 of 24 later, and I'm done. As with everything, I don't go in any exact order when it comes to filling in the background. Now I just have to cut out Edgar, leaving a bias around the needlepoint....

and then I get to frame him:
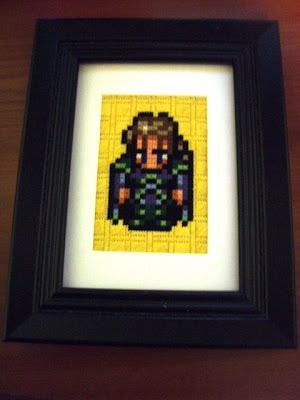
And that's that.
If you liked this tutorial, please let Digg know that you dugg it
Sprite Stitching 101
So I've been being a bit of a showpony around the internet, spreading pictures of my needlepoint sprites around various forums in a way usually reserved for stolen pornographic footage and email chain letters. And if my attempts to show off aren't ignored entirely, then I'm usually met with other sprite fans asking how I make them.
Now, even though I am trying to sell them (ahem: My Etsy Shop), I have no issue with instructing other people how to make them. I've been the beneficiary of free information too many times to be into the KFC secret recipe way of doing things.
So in response to the vast multitudes (read: handful (read: small handful (read: just a couple of people))) asking for this, here is my tutorial, Getting a Pattern:
First I should confess: whenever one of my sprites is met with admiration, I am always a little surprised. I am very lazy, very clumsy, and very sloppy and I learned how to make these things mostly by skimming a needlepoint book during my lunchbreak at work. I tend to take a "just wing it" approach to these things, and many of my methods and preferences developed from laziness. So if you're a cross stitcher who spends time separating strands, preparing fabric, paying attention to your needle size, making sure the back looks neat, and so on, then you're already much better than I am and making these should be a simple matter of transitioning past the X-stitch.
Preparing the Pattern and Getting Supplies
*** Now because I tend to act first and work out the problems later, I cannot really help you much on how to prepare your work regarding how much floss you will need or where you should position your sprite on the canvas, etc. I will tell you that I will be using 14 ct plastic canvas, which means you will get 7 pixels per inch using the mosaic stitch and 14 pixels per inch using a cross or half cross stitch. If you already have a preferred method of preparation, I would recommend sticking with it. ****
1. Before going to the craft store, find whichever sprite you want to stitch and save it to your computer. I personally prefer using The Shyguy Kingdom since they have such a large selection. I would recommend using a simple sprite to start off - think a small NES character.
For the purpose of this tutorial, I am going to make Edgar from Final Fantasy VI because he is small enough to use the mosaic stitch, but complicated enough that he has some shading and thus some more in-depth color matching will be needed.
2. So first I right click and save the sprite sheet for Edgar to my harddrive:

I want to do just regular old Edgar, so I will cut and paste the top left sprite into a new file on Photoshop (I am assuming you already know how to do this, but if I am assuming too much, just let me know) and save it as a bmp file. I am also going to note the size of the new file (16 pixels wide by 24 pixels long) for later.
Optional Step: If going back and forth between your home and your craft store is a big deal, figure out which color you want for the background now by using the fill bucket in the background to see which color looks good against your sprite. I usually wait until after I have finished stitching my sprite to figure out what my background color will be, but I also work next door to Hobby Lobby so frequent visits is not a big deal. When you have found a color you like, save it and PCStitch will also give you the floss number for that color.
Now I have regular old Edgar, all by his lonesome:

Ignore the fact that he looks green on this website. I don't know why that happened. The actual file on my computer does not look green, and that is the important thing.
*** Note: This next step will be a doozy, and it is ONLY TO FIND OUT WHICH COLORS YOU NEED VIA PCSTITCH. If you are doing something simple, like the original Megaman, you can run the sprite through PCStitch to get his exact colors or you can just go to the craft store and get black (310), white (5200), a fleshy color (I use 945 most of the time, but PCStitch recommends 744 in the case of Megaman), and whichever light blue and dark blue you happen to think matches up the best (by the way, PCStitch recommends 3846 for light and 3843 for dark in the case of megaman). If you are doing a complicated sprite with a lot of shading or colors, I strongly recommend using PCStitch or whatever your already preferred method is if you're an experienced stitcher. It would suck to finish one of these things, then stand back and realize it looks kind of weird because you got the wrong shade of blue ***
3. Since Edgar is has some complicated coloring going on, I am going to run him through PC Stitch first. PCStitch is a great program you can download as a demo for free (you can't save or print in the demo but we won't be needing to do that here anyway).
After opening PCStitch, go to File > Import and import the bmp file you saved earlier. The first screen will allow you to crop the picture. I don't need to crop any of Edgar, so I'm just going to hit next. The next screen allows you to erase parts of the picture. Again, I don't need to erase any of Edgar, so I'm going to hit next. Now here is the important screen:

I am going to click the "stitches" option and enter in 16 pixels wide by 24 pixels long (from before when I noted the dimensions of the image in photoshop). For this particular image of Edgar, it should not matter, but I generally unclick "smooth colors" as well. It also does not matter for this tutorial (we are just using the program to get the DMC colors), but, depending on your project, you might also want to make sure the cloth count input matches your fabric or canvas. If you haven't used PCStitch before, definitely play around with it. Now that I've got Edgar to 16x24 pixels, I will click Next yet again.
Next screen is to adjust for brightness...no need for that here. Next.
Now the next screen is for floss colors. It is also not important for this tutorial, but it is a fascinating screen you should play around with when you get a chance: see what a picture will look like if you make with 14 colors or 200 colors. See what it will look like if you only use metallic floss or rayon floss, etc. But I digress: FINISH.
Now I've got my edgar pattern. I am going to go to View > Zoom to 300% and then View > Display Stiches As > Colored Blocks + Visible Symbols (or ctrl-F5). And I get this:

At the bottom of the screen is a row of colored blocks that correspond to the pattern. If you roll your pointer over the block, a pop up will tell you the DMC Floss number and the color name. In my image, the example is #809 - Delft Blue. Write down all the color numbers for your craft store shopping list, and if you own PCStitch, save the pattern for future reference. If you don't own PCStitch, just remember all the above steps (it will be a snap after a few times) so you can retrieve your pattern at your leisure later.
In the case of Edgar, we need 310, 319, 333, 433, 704, 796, 809, 3045, 3776, 3823, and 3825 (and if you filled in the background in the optional step, you should have a background color for that too). Most small sprites will only need 1 bundle (with leftovers to spare), maybe 2 for black and larger fields, for each color in the sprite, but the background usually uses up 3-5 bundles easy.
4. So now you've got your floss shopping list. Now if you don't already have some, add 14 ct plastic canvas (in Houston at least, in Hobby Lobby it comes in sealed packages with 2 sheets each for around $2.39 while Michaels sells them individually for around 79 cents a piece - both stores keep them near the larger plastic canvas usually in an the aisle next to the DMC floss), embroidery scissors, and needles (I prefer tapestry needles around size 20-24 as they don't prick my fingers). I usually hold off on the frame and mat until after I finish the sprite since I don't plan ahead, but if you already figured out how large it is going to be, add those to your list too - Walmart usually has some bargain frames that come with mats for $3 on display in the aisles of their stores.
If you plan on doing a lot of these, you might also want to pick up a copy of a stitch encyclopedia or sampler. I use this one. It isn't necessary for this tutorial as I will link you to diagrams of the stitches.
Now you are ready to begin stitching. I recommend finding a DVD set of a tv show you like and settling down for a marathon viewing because the stitching will take you FOREVER.
Stitching Your Sprite
This will be more free-form than the last section. I like to stitch the outline of my sprite first so I can lay the mat over it and make sure it will fit (I've learned from past mistakes), but if you prefer doing it from inside out, that's fine too. There's probably a "correct" way of doing these things, but I sure don't know it. I just know this works for me.
1. I usually just eyeball where I need to begin stitching on the canvas and can't really help you with knowing the best, prepared way to begin. If you are also an eyeballer, for your first sprite, I recommend just starting near the middle of the plastic canvas until you have gotten used to how they will translate.
You could, of course, figure out how big your sprite will be (remember, 1 inch = 7 pixels for mosaic stitch or 14 pixels for half cross stitch), how much space you will need for background and for a bias around your canvas all ahead of time so as not to waste canvas....but I can't say I do that. Then again, I have recently had some major issues with a few sprites, after hours of stitching, not fitting into the standard mat size because I did not plan ahead to make sure that they would...so fair warning.
2. I usually start with the outline, and I usually start with that in the top left corner and work my way counter-clockwise. I use all 6 strands of the floss, because I like the full look it gives.
Since Edgar is small, I will be using a mosaic stitch, which looks like a perfect little pixel. For larger sprites, I use a tent, or half cross stitch. Here are examples:
If you are new to needlework, here's an explanation of how to start a stitch. I use the waste knot most of the time:
E-How: Your First Stitch
To sum it up: You basically just make a knot in your thread, push through on the front side (the side everyone will look at when you are done) and work your stitches over the tail on the backside until it is secure enough to cut the knot off.
The mosaic looks like a cross-stitch, but it isn't. Here are two explanations the mosaic stitch:
Stitchopedia's explanation of the Mosaic Stitch
Threadneedle's explanation of the mosaic stitch
Here is an example of a tent stitch, which is basically a cross stitch with only one side of the X, if that makes sense:
Stitchopedia's explanation of the Tent Stitch
Threadneedle's explanation of the tent stitch
When you start to get to the end of your floss, push your needle through 3 or 4 stitches on the back side to anchor it and then cut the excess thread off.
So now you should be able to stitch the sprite. I personally just follow the pattern on PCStitch on the computer screen most of the time, and occasionally print out simple, easy to follow sprites through Photoshop if I plan to work on it outside of the house (you must buy PCStitch to print out patterns...I'll get around to it eventually). Some people like to graph the patterns themselves or you could even use a bead sprite you've already made for a pattern.
I usually just do outline + black first and then do the colors in whichever order strikes my fancy.
Here's what I've got done tonight:


Stitching the sprite alone takes me about 4 hours to do.
Preparing for the Background
1. Now it's time to start getting ready for the background. I keep a couple of mats on hand to do this, but if you don't have a mat yet, it's not necessary.

The openings for the smaller mat measures 3 inches wide by 4.5 inches tall. The larger mat opening measures 3.5 inches wide by 5.5 inches tall. I'm going to center my sprite inside the mat (if you don't have a mat, just use a ruler to figure out how big the window should be) and count the holes on each side. Then I'm going to remove the mat and trace a rectangle with a pen, adding 2-3 holes on each side for a bias.
For Edgar, that means I am going to count 10 holes up and draw a line across that row. Then I'm going to do the same thing on the bottom. On the sides I'm going to count 7 holes out on each side and draw a line on that column. Here's a picture with the rectangle:

2. Now it's time to choose the background color, if you haven't already. I have a whole stock of DMC floss, so I usually just put them up against the sprite and figure out which one I like best. When I first started stitching, I would just bring the finished sprite in with me to Michael's or Hobby Lobby and hold the floss bundles up against it until I decided which color I wanted.
Remember, you're going to want several bundles of this color because doing backgrounds definitely eats up floss like none other.

I go compare a lot more colors than this, but that's just to demonstrate. I like the yellow (#973) the best, so I'm going with that.
Stitching the Background
1. For Final Fantasy characters, it's become a tradition for me to use a variation of the Scottish Stitch:
Stitchopedia's Explanation of the Scottish Stitch
But there's tons of stitches you can choose from, you can consult Stitchopedia or, if you have one, a hardcopy Stitch encyclopedia. I try to stick to diagonal stitches because I find that they cover the canvas better.
2. I almost never follow stitch diagrams exactly for my background stitches. I like to mix it up by making the stitches wider, longer, etc. For this sprite, I'm going to make the inside cushion of the Scottish stitch a 7x7 square. I'm also going to make the border around the cushions 3 holes long because this will allow me to create an interlocking, Celtic-like pattern.

I've adjusted the contrast so you can see it better...this is the beginning of my scottish stitch, complete with the waste knot. I always start in the bottom right corner of the background.

This is the first square finished, as well as the start of the border. Now I am going to kick back and watch 24 while I finish up this background, which will also take me about 3 or 4 hours to finish.


So a good chunk of season 1 of 24 later, and I'm done. As with everything, I don't go in any exact order when it comes to filling in the background. Now I just have to cut out Edgar, leaving a bias around the needlepoint....

and then I get to frame him:

And that's that.
If you liked this tutorial, please let Digg know that you dugg it
Subscribe to:
Posts (Atom)
